
Torque Tightening
To obtain a leak-free flange connection, a proper gasket installation is needed, the bolts must be assign on the correct bolt tension, and the total bolt strength must be evenly divided over the whole flange face.
With Torque Tightening (the application of preload to a fastener by the turning of the fastener’s nut) the correct bolt tension can be realized.
Correct tightening of a bolt means making the best use of the bolt’s elastic properties. To work well, a bolt must behave just like a spring. In operation, the tightening process exerts an axial pre-load tension on the bolt. This tension load is of course equal and opposite to the compression force applied on the assembled components. It can be referred to as the “tightening load” or “tension load”
www.enerpac.com
Torque wrench
Torque Wrench is the general name for a hand-guided screwing tool, and used to precisely set the force of a fastening such as a nut or bolt. It allows the operator to measure the rotational force (torque) applied to the bolt so it can be matched to the specifications.

Manual and hydraulic wrench
The selection of the proper flange bolt tigtening technique requires experience. The successful application of any technique also requires qualification of both the tools that will be used and the crew who will do the work. The following summarizes the most commonly used flange bolt tightening techniques.
- Manual Wrench
- Impact Wrench
- Hammer Wrench
- Hydraulic Torque Wrench
- Manual Beam and Gear-Assisted Torque Wrench
- Hydraulic Bolt Tensioner

Torque loss
Torque loss is inherent in any bolted joint. The combined effects of bolt relaxation, (approximately 10% during the first 24 hours after installation), gasket creep, vibration in the system, thermal expansion and elastic interaction during bolt tightening contribute to torque loss. When torque loss reaches an extreme, the internal pressure exceeds the compressive force holding the gasket in place and a leak or blow-out occurs.
A key to reducing these effects is proper gasket installation. By bringing the flanges together slowly and parallel when installing a gasket and taking a minimum of four bolt tightening passes, following the correct bolt tightening sequence, there is a payoff in reduced maintenance costs and increased safety.
Proper gasket thickness is also important. The thicker the gasket, the higher the gasket creep which in turn can result in torque loss. On standard ASME raised face flanges a 1.6 mm thick gasket is normally recommended. Thinner gasket materials can take a higher gasket load and therefore higher internal pressures.
Lubrication reduces friction
Lubrication reduces the friction during tightening, decreases bolt failure during installation and increases bolt life. Variation in friction coefficients affect the amount of preload achieved at a specific torque. Higher friction results in less conversion of torque to preload. The value for the friction coefficient provided by the lubricant manufacturer must be known to accurately establish the required torque value.
Lubricant or anti-seizure compounds should be applied to both the nut bearing surface and the male threads.
Tightening sequence
The first pass, lightly tighten the first bolt then move directly across or 180 degrees for the second bolt, then move1/4 turn around the circle or 90 degrees for the third bolt and directly across for the fourth. Continue this sequence until all bolts are tightened.
When tightening a four-bolt flange, use a criss-cross pattern.
Preparation flange bolt-up
In a flanged connection, all components must be correct to achieve a seal. The most common cause of leaky gasketed joints is improper installation procedures.
Before beginning a bolting process, the following preliminary steps will avoid future problems:
- Clean the flange faces and check for scars; the faces must be clean and free of defects (burrs, pits, dents, etc.).
- Visually inspect all bolts and nuts for damaged or corroded threads. Replace or repair bolts or nuts as necessary.
- Remove burrs from all threads.
- Lubricate the threads of the bolt or stud, and the surface of the nut face adjacent to the flange or washer. Hardened washers are recommended in most applications.
- Install the new gasket and be sure gasket is properly centered. DO NOT REUSE old gasket, or use MULTIPLE gaskets.
- Check flange alignment ASME B31.3 Process Piping:
…flange faces must be parallel within 1/16″ per foot of diameter, and flange bolt holes must be aligned to within 1/8″ maximum offset. - Adjust the position of the nuts to insure that 2-3 threads is visible above the top of the nut.
Irrespective which method of tightening is used, above determined checks and preparations always must be done.
Remark(s) of the Author…
My own experiences about…Torque Wrenches
- In the past I have assembled hundreds leak-free flange connections, from NPS 1/2 to NPS 24 and bigger. Rarely I have used therefore a Torque Wrench.
In practice, “normal” pipe flange connections are almost never assembled with a Torque Wrench. The difficultest connections for me always were the “little ones” and then especially the Raised Face type above Class 300 (RF Height = approximately 6.4 mm).
Relationable the flange faces from a NPS 1/2 flange are smaller then for example a NPS 6 flange, and the chance on misalignment, in my view is much bigger.
In practice I encounter regularly flange connections, where the alignment do not in the tolerance limit. If simply the order of Tightening Procedure is followed the Mechanic is not well busy. Possibly must be begun on bolt six instead of on bolt one. Use your eyes during flange assembly, it is very important and contributes very probably to a leak-free connection
Improper flange connections – the bolts are too short !
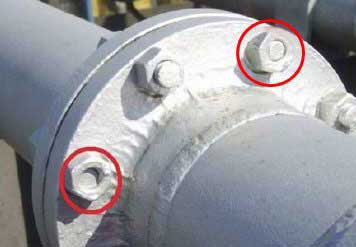
What can you do?
- The picture show a improperly bolted flange, because two bolts are too short, and the nuts are not completely on the bolts. This means that the joint may not be as strong as it should be. Flanges are designed so that the entire nut-bolt combination holds the forces on the flange. If the nut is only partially screwed onto the bolt, the connection may not be strong enough.
- If your job includes putting equipment together, assembling flanged pipe, bolting manhole covers or other bolted connections on equipment, or other equipment assembly, remember that the job is not complete until all of the bolts are properly installed and tightened.
- Some equipment requires special bolt tightening procedures. For example, you may have to use a torque wrench to correctly tighten the bolts to the specification, or tighten the bolts in a special order. Make sure that you follow the correct procedure, use the correct tools, and that you are properly trained in the equipment assembly procedure.
- Check pipes and equipment for properly bolted flanges as part of your plant safety inspections. As simple guidance, bolts that do not extend beyond the nuts should be reviewed by a plant piping craftsman or engineer.
- If you observe improperly bolted flanges in your plant, report them so they can be repaired, and make sure the required repairs are completed.
- Inspect new equipment, or equipment which has been re-assembled after maintenance, to make sure it is correctly assembled and properly bolted before starting up.
What is the proper length of a Stud Bolt?
As a rule, you can use: The free threads of the bolt above the top of the nut is equals to 1/3 times the bolt diameter.
Post time: Aug-04-2020